Tuesday, November 8, 2011

Aussie Saddle


Highly appropriately one of the last saddles I made before travelling down under was an Australian Stock Saddle. I had made one once before but that one had a swinging fender and a horn, so was more western in appearance. I had used a modified western tree for that one, with cut down swells. This one looks more like an english saddle but with the addition of the thigh pads called poleys. You can see a picture of it in progress in a previous post.


So with a new tree must come a new pattern. This one was pretty tricky given the skirts are combined with the flap. So the cut-out for the stirrup bars must be in the right place and the flap must fit over the poleys with no creases or rucks. Took a bit of time to get it right. I then added the stitchmarks, the slot for the overgirth and some decorative tooling at the bottom of the flaps. I love little subtle details like the tooling that really brings it alive. I say tooling, I should say carving, as I don't tend to use stamps unless I think they're properly in scale.

The panels were interesting to make. I used felt as most aussie saddles have a serge panel (or a western-style sheepskin panel). They were a little tricky to get symmetrical but seems to have worked. An aussie saddle sits quite high above a horse's back compared to english saddles, espcially when new and then they can settle by a couple of inches when used regularly. That way the serge moulds itself to the horses back. This way, you didn't have to be so precise when ordering a new saddle. Given the distances involved in bush travel you can see why someone would want a saddle to fit right straight out the box.

Back to my saddle. I got the colour wrong. I only kind of realised it once I had attached the flaps, but it just wasn't red enough. So this saddle is a prototype, I'll probably keep it for myself. The next one will be in the right colour!

Thursday, November 3, 2011

Delays...

Irmgard from Germany sent me this lovely picture of the set featured in the last post (I know I know, I promised an Australian set - you'll have to wait again for that one!).
We have had bad news regarding our shipping. It is still at the depot near Truro, accruing storage fees. All because the company paying for it has messed around and has failed to realise what an enormous headache this is for us. Even when it all gets on a boat, that takes 6 weeks and then it has to clear customs in Perth. If it makes it to Perth before Christmas, you can garantee it will be held up due to the Christmas break. So our new house is looking a little empty and will do for some time. What a pain. Well, at least we have some fantastic friends here who are all planning a big Christmas celebration. We'll be having breakfast at Graham's, starters at Julia's, main course at Bill and Em's, pudding at ours and then borrowing Jen's pool in the afternoon. So all I have to worry about is dessert, which is good considering my lack of good utensils!
Can't believe I'm talking about Christmas already!

Wednesday, October 12, 2011

From the other side of the world...

Well, we've been in Kalgoorlie, western Australia for 11 days now. I started work last Tuesday which hasn't given me much time to sort general life stuff out so things will take a while to settle down. We are currently in temporary accommodation in a fully serviced unit for 4 weeks, until we find a place to rent. Which is not easy. The rental market is very tight here so I have to be on the ball investigating each property that comes onto the market. Thanks to Andy's new interest in motorbikes and a Suzuki in the crate on its way, we need to find somewhere with a secure garage or shed which adds another dimension to the search. Actually it probably would be fairly easy if it weren't for that. The biggest demand seems to be for family homes and I don't want anything too big as I invariably end up making a mess - the bigger the house the bigger the mess!
At the weekend I did manage to finish a tack order, believe it or not. I had pre-cut and dyed the parts for a classic scale bridle to go with the brown saddle from the last post. So since nothing here happens on a Sunday I was able to get on with that and finish it. The whole set will be jetting off to Germany at the weekend. It is pictured above on my Equorum Norman Cob, known as Rowanoak. Poor Rowanoak missed the boat and had to be packed in my very full suitcase. Good job she's slightly bendy and not a resin! For those of you that are interested she has a customised neck and alpaca mane and tail, which is beautifully soft.
I didn't get a chance to finish the Australian set. More on that in the next post.

Saturday, August 13, 2011

The last two sets...

Before I leave for Australia, I need to finish these two sets. One is a classic scale general purpose set in dark brown, the other is, highly appropriately, an Australian set!


So far for both sets I have made the trees and covered the seats. Next the leather pieces will be cut, dyed and then the rest of the saddles can be assembled. Since coming up with my new tree technique I have had to re-design my patterns, so this stage has taken a little longer than I hoped it would. But the tree has to be right! If the tree is wrong, the saddle won't look good no matter what you do. I'm really pleased with both tree designs, and also very happy that my new technique transfers well to classic (1:12) scale.

Sorry about the photos, they are particularly rubbish today!


The Australian saddle is a bit of a hybrid. Many features are the same as an English saddle, like the base tree (although much deeper), and stirrup bars. But then many features are Western. For this particular saddle the customer wants to use a western cinch, so I'll be making what is known as a Bate's rig which uses dee rings like a western saddle. An additional over-girth can also be used and the rigging straps use Tackaberry buckles. The buckle has a hook on its base which the cinch goes on - allowing for very quick cinching and uncinching. I'll try and figure out how to make these buckles when the time comes to make the girth....


Sunday, August 7, 2011

Another Move on the Horizon!

Some of you may already know this but I can now make it more public knowledge. For the last 10 months my other half has been working in Australia on a rather gruelling schedule. I think since Christmas he's only spent 10 weeks at home and for half of that time I've been working, so we haven't seen much of each other. So, a few months ago we talked about moving to Australia again, so we could both have 'normal' jobs again and both be at home every evening and weekend.

And so it's happening. We have both secured jobs and will be moving at the beginning of October, all being well. We'll be living in Kalgoorlie in Western Australia, where we have lived previously for 18 months so we know it well and have a fair few friends there. Our house here will be rented out, although we still have to do some re-decorating and repairs. I will also have to do a big sort out of my model collection, many of which have already been with me once around the world so I will be selling off quite a large number. I have far too many now anyway.

So this also means that I will be unable to make any tack for a few months until my stuff arrives in Australia. I will be finishing off a couple of orders over the next few weeks and have contacted other people whose orders will be post-poned. Meanwhile I won't be taking on any new orders. I have to figure out how busy I will be with my new job, and I'd also like to be selfish and get a real horse of my own! I think I will finally have the means and time to be able to get my first horse, and hopefully do a bit of competing in eventing which is popular in the area.

So this blog, at this time next year, may well feature more about real horses than the model variety, but I'll still be making tack, just not very much and probably for myself or for the odd sale.

Saturday, July 9, 2011

NAN Results


I'm not 100% on how many top-tens my tack helped their owners to, but here's one I know of for sure. Stacy Quick commissioned this pony jumping set earlier this year for her Newsworthy model. I featured the set on the blog. Stacy was very kind in letting me know that the tack helped her gain NAN qualification. Her entry ended up getting third, which is a great result. I love the co-ordination between the blues in the set and the gorgeous jump.


Thanks Stacy and Congratulations!

Thursday, July 7, 2011

Long time no post!


Sorry its been so long since I've written. Not a huge amount has gone on with tack making for the last month or so. I've been making more Equorum tack and I've had some great feedback about this tack from buyers, which is lovely to hear. I also had a trip to Kazakhstan with work which I may do a post on!


Back in May I held my annual show, the Dartmoor Live. We had 16 entrants this year, 6 up from last year! Personally I think the show went pretty well, over-ran a little bit time-wise, but no-one seemed to mind too much. Lunch time was longer than anticipated due to the excitement of the raffle and my new 'favourite model' awards. I gave everyone at the show a special ribbon prize to award to their favourite model at the show. Everyone seemed to enjoy this a lot but choosing just one was very difficult!


Performance Champion was Heather Irvine's gorgeous Justin Tyme resin with a cross country set up.


And overall Breed champion was Ann Sheppard's cold painted china Valentin, a superb model and my personal favourite of the whole show. Reserve was the little palomino Dauntless clinky and reserve to reserve went to the Indy.


I was very pleased when my HA shetland pony Rhubarb won the UK workmanship championship. He was painted by Amanda Greaves a couple of years ago and finally has his recognition! He won a brand new medallion kindly donated by Kelly Savage, which I have instructed Kelly to send straight to Amanda as a thanks for her painting skills!

It was a tiring day but well worth it in the end!

Hopefully I'll be back on track with the tack soon, I have a lot to do in the next few weeks so I hope I can remember to take some pics to share...

Thursday, May 19, 2011

Great New Tool!!

Stitch-marking is something that hobbyists have started to expect to see on top LSQ tack. There was a phase when stitch-marks were put around just about every single piece on an english saddle, but thankfully most tack-makers have 'grown-out' of that tendency. In real life, you usually only see stitch marks around the edges of knee rolls and also perhaps along the upper edge of jockey near the seat welt. Most saddles do not have them all the way round the flaps and jockeys. That's the case for the European market anyway, you do see them more often on American hunt-seat saddles. In the past I have made stitch-marks by hand, which is painful, time-consuming and never looks that great due to natural inconsistencies. So when I discovered pouncing wheels, I was most pleased that I could save so much time using them.

But, for some time I have been dissatisfied with my normal pouncing wheels. Pouncing wheels are made for transferring designs through paper, usually nice long sweeping lines. The point spacing isn't too critical as they're used as a guide for paintwork and similar applications. The spacing on my pounce wheels is fairly wide, and not in scale even for traditional scale tack items.

So, I've always been on the hunt for something better, been it's always been tricky knowing what terms to use in search engines or ebay for example. Until that is, I cam upon a thread on a modelling forum, focussing on model aeroplanes. They mentioned a tool called a 'riveter', in particular one made by a company called Trumpeter. I did a search and immediately came up with a very reasonably priced product, at £4.95. That's a pretty good price considering my pounce wheels were over £12, so I bought one and it arrived today. Admittedly, the tool is plastic and possibly a little delicate, so we'll see how it holds up over time.

But I was immediately impressed with the wheels it came with and their point spacing. Here's a picture of the three metal pouncing wheels next to the new tool with it's 4 blades (one is in the tool). The left two pouncing wheels have a point-per-inch count of 14-15. The other wheel has a count of 23 (I use this one most on my tack projects). You may not be able to see the points on the blades very well, but they have counts of 23, 27, 33 and 44!

44 dots per inch is hard to count!

After my show at the weekend I will be trying them out on leather, and I have high hopes! I'd love to find something similar in a wooden or metal handle, but beggars can't be choosers. Maybe I can persuade Andy to make a nice handle for me.....

Sunday, April 24, 2011

I don't paint much....

But I felt inspired today and painted my little Pepys resin whilst watching the Badminton Horse Trials. I haven't painted anything for about 6 or 7 years, and even then only have about 5 models to my name. I think I was attracted to this resin because he is small and textured, which i think makes it easier to paint! I even attempted some patches of roaning and a blue eye. His feathers are also a bit grubby from playing around with his pals all day.

I think I'll try showing him as a Gypsy Cob foal, any ideas for a name?

Wednesday, April 20, 2011

Another March Bridle


Seems that March was a bit of a bridle month! I made a simple snaffle bridle for a friend Caroline Jones in exchange for some of her old tack making supplies. This one features raised nose and brow bands but no stud-hooks. Once in a while when I make a bridle without the hooks I realise just how quickly I can make them!

The bridle is modelled by new fairly new unpainted Jasmine resin who has recently had some 'surgery' to correct her wonky legs. Luckily the surgery was non-invasive and just involved a long hot bath!

Out of interest Caroline writes her own blog about pedigree assignment called Pedigree Chum! It's something I would love to do but seems an daunting task given the size of my collection and my ever decreasing spare time.


Thursday, April 7, 2011

Dressage Bridle

I made this for a great customer Marty in the UK, who wanted an upper level dressage bridle to fit his Peter Stone Warmblood. I don't actually have one of these models so I was happy to find out that Salinero's head is pretty similar. This bridle had my usual top end features, including a crank style noseband, stud-hook fastenings onto the bit and leather laced reins. It seems that not many tack-makers use leather to lace reins and I often wonder why. I tried using thread once upon a time and got really frustrated with it. Now I cut some very fine strands (about 0.5mm) of very thin lace, at the same time as I cut the main pieces for the bridle. I save the super-thin areas of my hides for this purpose, so I don't have to do any additional skiving to get the leather thin enough. Then along the reins I cut a short (about 1mm) slot every 5mm. Next i use my fine needle-nosed tweezers to thread the lace through the slots, taking care not to twist the leather lacing. I usually use about 3 x 10cm strands to lace one rein, or thereabouts. Each end of the strand is tucked and glued onder the previous 'turn'.


Wednesday, March 30, 2011

Newsworthy Show Jumping set

I completed this a week or so ago but it's taken me a while to get around to posting about it. A lovely customer Stacy ordered this for her OF and CM Newsworthy models. She gave me quite a free rein, only stipulating that she wanted it in dark brown.


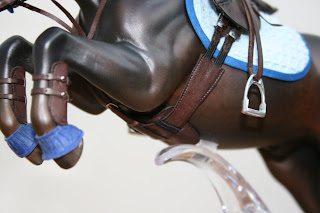
The saddle is made with my new style tree with a square cantle; the tree had to be fairly wide as Newsworthy is a fairly chunky pony! The flaps have a standard knee roll which is hand-stitched for longevity. I'm really pleased with the girth and the optional stud-guard - it just fits in front of the pony's stand.


The bridle is pretty neat, it's not raised but has slimline padding and a flash attachment. All the fastenings onto the bit are stud-hooks so the bit can be changed, and I even made latex martingale and rein stops in blue to match the over-reach boots and saddlecloth.

Finally I tried something new out for the front tendon boots. The straps just have slits in which fit over studs, and then the keeper is niftily threaded through and overall looks pretty neat. I lined them with thin pliver, they didn't need anything else.


Great news as on the 26th of March Stacy took the set to a live show where it picked up a blue ribbon and NAN qualification. Well done Stacy!

Tuesday, March 22, 2011

Equorum Tack

I was recently asked by Helen Moore of Equorum to develop a line of tack suitable for her handmade latex horses and ponies. I was very flattered to be asked and set about making up some examples sets that we could sell via her website. You can buy from an ever expanding range of pose-able horse and pony breeds, riders and accessories. I think they're adorable and my collection is growing month by month. They make a lovely antidote for the frustration that can often come along with trying to create super-realistic set-ups, using fragile artist resins and delicate tack! Plus, more and more shows in the UK are having dedicated divisions for handmade/craft type models which I think is fantastic as they are all very much a part of our model horse heritage.

I started off with one of the smallest in the Equorum range, the Shetland Pony, pictured below. I made a pony pad with suede seat and knee rolls. The girth and stirrup buckles work with tongues whereas the bridle has slip buckles. The set is not as detailed as my normal hobby tack but we needed to keep both costs and production time down.

Next I tackled the Connemara, one of my favourite moulds. For this one I made a more conventional General Purpose saddle with knee rolls. The bridle has buckles with tongues for added realism.

On my workbench right now I am making a set to fit the Show Hunter Pony and a side-saddle for the Connemara. Next up will be new prototypes for the Welsh B pony, the Welsh Cob and the Trakehner, and these sets will be available to buy from the Load The Lorry page in a few weeks.

Longer term I hope to develop other styles, such as dressage sets, cross country and polo sets. It makes a really refreshing change to make simpler tack and not be so obsessed with the finer detail. I think many of these sets could be shown with success as the tack is user-friendly and has all the right proportions.

Wednesday, March 16, 2011

My new favourite glue!


That post title is a little odd, but I've found a glue brand that really works! In the past I've used various glues and I've had most success with Contact type glues. This new one is Evo-Stik Impact glue. It isn't too messy, cleans up well, and sticks leather really well (and instantly, no standing around holding things together!). It is also flexible so the finished tack doesn't end up feeling stiff and brittle.
I have decided that I hate Duco Cement. I bought a couple of tubes from Rio Rondo last year and have been trying it out. I find it really stiff and brittle, and doesn't seem to like some types of leather. It also makes a horrid mess and is a nightmare to get off leather. I tried it because I thought that's what everyone else uses, but now I honestly don't know why people use it.

I can really recommend the Evo-Stik, off to buy a load more this weekend!

(PS posts will be more frequent now, I promise. Had a very busy few weeks!)

Sunday, February 20, 2011

Saddleseat Sets Finished!

It really shouldn't have taken me this long to finish these off, but then it always happens this way so I should learn to expect it!

I'm pretty tired after playing two hockey matches this weekend (though I do actually doubt my ability to get off the sofa and go up the stairs!), so this post won't be too long. I also managed to take some photos of the sets which will also go on the website. The only thing to tell the two sets apart is that mine has a red noseband and a slightly longer girth, otherwise they're the same.

The other set will be flying down to Alex in Australia in the next few days. My lovely Darcy resin painted by Jennifer Scott is modelling the sets, such a nice sculpture! This particular one I was lucky to win at the NAN auction in 2009.

So that's the end of the saddleseat set posts for a while, I'll soon be starting a couple of pony sets.


Wednesday, February 9, 2011

White Stirrup Pads

For the saddleseat sets I have been working on recently I wanted the stirrups to have the proper white pads. I could have got them ready done in the form of Sulser Saddlery stirrup irons, but I feel they are a little small for true trad scale. I prefer the RDLC english irons available from The World of Model Horse Collecting on Ebay. They aren't available with white treads so I've had to come up with a way of making my own.


I used white fimo from which I cut a narrow slab. Into this I pressed the bottom of the stirrup about halfway through the fimo. With a knife I was able to trim all the way around the stirrup and also any excess that poked through the top of the stirrup base. I then prodded the fimo piece gently from the top until it fell out, and then straightened it out a little. Into the oven they went, and with a small amount of trimming with a knife they can then be inserted into the stirrup. I added some glue for extra security.

An alternative would have been to buy the cast metal treads and paint them white, but for me I always get fed up painting metal items and find this method quicker.


Saturday, January 29, 2011

A new project

I have had the flu over the last few days :-(

At least it has given me time to think about some little projects that need doing, in addition to my orders and tack projects for myself. Recently I bought a wooden pastel box with the intention of converting it into one of those swanky tack cases.


Just need to get some dowelling and hooks, and hand the whole lot over to my boyfriend Andy who I know will do a superb job of converting it! He is much more of a perfectionist when it comes to woodworky stuff; my work would suffice, but his looks good as well. He is returning from Australia in a week so he can work on it in-between bouts of jet-lag! I'll hopefully get some pictures of it finished soon.....


Sunday, January 23, 2011

How I make my bridles

First thing's first, I don't use pre-cut leather lace. I use the same leather I make my saddles out of, but seek out the thinner areas with no blemishes. By doing it this way I get exactly the right thickness for straps and can also do more creative ideas. Below is a shot of all the parts required for a saddleseat bridle and there are also some stirrup leathers - can you recognise all the parts?


Once all the parts have been cut and hole-punched, I dye the parts using standard techniques. I place different projects on different pieces of scrap paper so nothing gets mixed up. Once dyed and dried the pieces will go into baggies according to their project. The photo below shows an un-dyed double bridle, a dyed double bridle (on the right), and some scrap pieces that I will use for all the extra fiddly bits (top left). I have to make sure these bridle pieces don't get mixed as although they are both double bridles for saddleseat, one is slightly finer than the other one.


I know many people may prefer pre-dyed lace as their is less chance of the dye transferring to a model, but as long as the tack isn't left on a model too long this shouldn't happen. It's only happened to me when I've been lazy and left tack on between shows a week apart. I would never recommend leaving models tacked up anyway, pre-dyed leather or not, as buckles and stirrups can scratch and reactions can happen to the models finish.

Hopefully the next post will show these bridles finished and with their saddles that I made back before Christmas!

Saturday, January 15, 2011

Western Set 2 Finished!


At last both western sets are complete! This has been an interesting journey, as I took on both these sets for trades, and wanted to test whether I could still make a good western set. Suffice to say I am very pleased with how they've both turned out, and I think I would be happy to take on orders for western gear in the future. After all, designing patterns, dyeing, finished, putting tack together uses all the same principals even if the tack 'genres' are very different. I think that's something to bear in mind if you make tack and just tend to stick to one thing. You'll find that there's so much transference of different skills that it won't take long to learn how to make a second style of tack compared to how long it took to make the first. This philosophy is embraced by Four Corners Tack hence you'll find I make tack inspired by horse cultures all over the world. Anyway, here are some pictures...


Monday, January 10, 2011

Western Set 1 Finished!

This has taken longer than I intended (as with all things I make!) but is finally finished! I think I should realise by now that everything always takes twice as long. The breastcollar is a bit loose in these pictures - I need to just add one or two more holes and then it's perfect. I'm pretty pleased with how it's turned out considering how long it's been since I made a western set.


These shots show my latest 'tag' that I will be using with all new sets.


Monday, January 3, 2011

2011 has dawned...

I'm not usually one for making resolutions at the start of the year. I think you can make them any time if you feel you must take action with something. I have a few resolutions that I have been trying to keep for a while now. They are: 1. make more tack, 2. make better tack, 3. take more photos and 4. try and cut down my model collection. I'm finding I'm making progress on all of them, although number 4 has been the hardest. That's not for want of trying, but models just aren't selling at the moment! Why is it always so much easier to buy.....


Here are a couple of shots of two of my models. Above shows Merlin, who is an Equorum model handmade in Dorset in the UK by Helen Moore. They are made of latex with silk manes and tails and come in a wide variety of moulds and colours (in fact, any colour you want!). They are poseable too so brilliant for performance set ups. Merlin has been tacked up with one of my driving harnesses, which was actually made for a Breyer classic scale warmblood, but fits lots of others too. The dog-cart was made by Bill Duncan in the US and the doll was dressed by Kris Gallagher. The doll/cart/harness combo took a different model to overall Supreme Champion at a show back in August.

Next up is Something Wicked, a Cooper resin I recently bought off my friend Teresa Botkins, who painted him a lovely silver bay. I had a little photoshoot with him in a variety of set-ups, including the Ridden Part-bred Arab set-up shown above. I can already tell he's going to be a very versatile model for performance. Again all tack was by me and unusually, I dressed the rider too (although that mostly consisted of some new boots and adjustments to the Breyer jacket). The backdrops in both shots were taken by me in the North Pennines of the UK. You can actually buy these backdrops from Kathy Casey who sells them.

Anyway, the actual purpose of this post is to advertise one custom tack slot which would hopefully be completed in Feb/March. There was two advertised on my yahoo group but one quickly went so please contact me via my website at www.fourcornerstack.com with your idea. I will then get back to you with a quote and we can go from there. I'm happy to do most things except anything medieval or Peruvian, my patience just can't take the strain at the moment!