Wednesday, April 20, 2011

Another March Bridle


Seems that March was a bit of a bridle month! I made a simple snaffle bridle for a friend Caroline Jones in exchange for some of her old tack making supplies. This one features raised nose and brow bands but no stud-hooks. Once in a while when I make a bridle without the hooks I realise just how quickly I can make them!

The bridle is modelled by new fairly new unpainted Jasmine resin who has recently had some 'surgery' to correct her wonky legs. Luckily the surgery was non-invasive and just involved a long hot bath!

Out of interest Caroline writes her own blog about pedigree assignment called Pedigree Chum! It's something I would love to do but seems an daunting task given the size of my collection and my ever decreasing spare time.


Thursday, April 7, 2011

Dressage Bridle

I made this for a great customer Marty in the UK, who wanted an upper level dressage bridle to fit his Peter Stone Warmblood. I don't actually have one of these models so I was happy to find out that Salinero's head is pretty similar. This bridle had my usual top end features, including a crank style noseband, stud-hook fastenings onto the bit and leather laced reins. It seems that not many tack-makers use leather to lace reins and I often wonder why. I tried using thread once upon a time and got really frustrated with it. Now I cut some very fine strands (about 0.5mm) of very thin lace, at the same time as I cut the main pieces for the bridle. I save the super-thin areas of my hides for this purpose, so I don't have to do any additional skiving to get the leather thin enough. Then along the reins I cut a short (about 1mm) slot every 5mm. Next i use my fine needle-nosed tweezers to thread the lace through the slots, taking care not to twist the leather lacing. I usually use about 3 x 10cm strands to lace one rein, or thereabouts. Each end of the strand is tucked and glued onder the previous 'turn'.


Wednesday, March 30, 2011

Newsworthy Show Jumping set

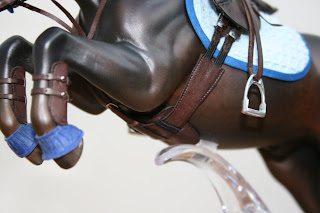
I completed this a week or so ago but it's taken me a while to get around to posting about it. A lovely customer Stacy ordered this for her OF and CM Newsworthy models. She gave me quite a free rein, only stipulating that she wanted it in dark brown.


The saddle is made with my new style tree with a square cantle; the tree had to be fairly wide as Newsworthy is a fairly chunky pony! The flaps have a standard knee roll which is hand-stitched for longevity. I'm really pleased with the girth and the optional stud-guard - it just fits in front of the pony's stand.


The bridle is pretty neat, it's not raised but has slimline padding and a flash attachment. All the fastenings onto the bit are stud-hooks so the bit can be changed, and I even made latex martingale and rein stops in blue to match the over-reach boots and saddlecloth.

Finally I tried something new out for the front tendon boots. The straps just have slits in which fit over studs, and then the keeper is niftily threaded through and overall looks pretty neat. I lined them with thin pliver, they didn't need anything else.


Great news as on the 26th of March Stacy took the set to a live show where it picked up a blue ribbon and NAN qualification. Well done Stacy!

Tuesday, March 22, 2011

Equorum Tack

I was recently asked by Helen Moore of Equorum to develop a line of tack suitable for her handmade latex horses and ponies. I was very flattered to be asked and set about making up some examples sets that we could sell via her website. You can buy from an ever expanding range of pose-able horse and pony breeds, riders and accessories. I think they're adorable and my collection is growing month by month. They make a lovely antidote for the frustration that can often come along with trying to create super-realistic set-ups, using fragile artist resins and delicate tack! Plus, more and more shows in the UK are having dedicated divisions for handmade/craft type models which I think is fantastic as they are all very much a part of our model horse heritage.

I started off with one of the smallest in the Equorum range, the Shetland Pony, pictured below. I made a pony pad with suede seat and knee rolls. The girth and stirrup buckles work with tongues whereas the bridle has slip buckles. The set is not as detailed as my normal hobby tack but we needed to keep both costs and production time down.

Next I tackled the Connemara, one of my favourite moulds. For this one I made a more conventional General Purpose saddle with knee rolls. The bridle has buckles with tongues for added realism.

On my workbench right now I am making a set to fit the Show Hunter Pony and a side-saddle for the Connemara. Next up will be new prototypes for the Welsh B pony, the Welsh Cob and the Trakehner, and these sets will be available to buy from the Load The Lorry page in a few weeks.

Longer term I hope to develop other styles, such as dressage sets, cross country and polo sets. It makes a really refreshing change to make simpler tack and not be so obsessed with the finer detail. I think many of these sets could be shown with success as the tack is user-friendly and has all the right proportions.

Wednesday, March 16, 2011

My new favourite glue!


That post title is a little odd, but I've found a glue brand that really works! In the past I've used various glues and I've had most success with Contact type glues. This new one is Evo-Stik Impact glue. It isn't too messy, cleans up well, and sticks leather really well (and instantly, no standing around holding things together!). It is also flexible so the finished tack doesn't end up feeling stiff and brittle.
I have decided that I hate Duco Cement. I bought a couple of tubes from Rio Rondo last year and have been trying it out. I find it really stiff and brittle, and doesn't seem to like some types of leather. It also makes a horrid mess and is a nightmare to get off leather. I tried it because I thought that's what everyone else uses, but now I honestly don't know why people use it.

I can really recommend the Evo-Stik, off to buy a load more this weekend!

(PS posts will be more frequent now, I promise. Had a very busy few weeks!)

Sunday, February 20, 2011

Saddleseat Sets Finished!

It really shouldn't have taken me this long to finish these off, but then it always happens this way so I should learn to expect it!

I'm pretty tired after playing two hockey matches this weekend (though I do actually doubt my ability to get off the sofa and go up the stairs!), so this post won't be too long. I also managed to take some photos of the sets which will also go on the website. The only thing to tell the two sets apart is that mine has a red noseband and a slightly longer girth, otherwise they're the same.

The other set will be flying down to Alex in Australia in the next few days. My lovely Darcy resin painted by Jennifer Scott is modelling the sets, such a nice sculpture! This particular one I was lucky to win at the NAN auction in 2009.

So that's the end of the saddleseat set posts for a while, I'll soon be starting a couple of pony sets.


Wednesday, February 9, 2011

White Stirrup Pads

For the saddleseat sets I have been working on recently I wanted the stirrups to have the proper white pads. I could have got them ready done in the form of Sulser Saddlery stirrup irons, but I feel they are a little small for true trad scale. I prefer the RDLC english irons available from The World of Model Horse Collecting on Ebay. They aren't available with white treads so I've had to come up with a way of making my own.


I used white fimo from which I cut a narrow slab. Into this I pressed the bottom of the stirrup about halfway through the fimo. With a knife I was able to trim all the way around the stirrup and also any excess that poked through the top of the stirrup base. I then prodded the fimo piece gently from the top until it fell out, and then straightened it out a little. Into the oven they went, and with a small amount of trimming with a knife they can then be inserted into the stirrup. I added some glue for extra security.

An alternative would have been to buy the cast metal treads and paint them white, but for me I always get fed up painting metal items and find this method quicker.